
Manual activities for children, family crafts
- Activities with wooden letters
- Mother's Day crafts
- Decorate your pens for back-to-school
- Notebook collage and makeover
- Painting dinosaurs
- DIY with straws
- Cardboard castle
- Cardboard dragon
- Making girly beaded barrettes
- Design your own soccer jersey
- Decoration recipe for children
- Making stickers
- Wooden bookmark
- Pyrography box
- Indiana Jones crafts
- Indiana Jones model
- Lego Indiana Jones sets
- Autumn crafts
- Halloween activities
- Children's pumpkin lantern
- Halloween decoration
- Halloween candle holders
- Halloween coloring
- Halloween beads
- Make Halloween earrings
- Halloween bracelets
- Halloween make-up
- Wooden spider brooch
- Halloween vase
- Halloween masks
- Witch in Fimo clay
- Welcome to Halloween
- Halloween cross-stitch
- Halloween recipes
- Barbie witch dress
- Witch's hat and broom
- Carnival crafts
Trendy leather watches

Watch with double or triple leather strap decorated with charms, unique to personalize!
Watch with double or triple leather strap decorated with charms, unique to personalize!

Making a witch in Fimo clay

Sensitive souls please refrain!
The witch's construction, piece by piece, may frighten some!
Take a look at this autumn-colored witch in Fimo modeling clay for a Halloween craft in which children will need the help of an adult ( Fimo clay is reserved for children aged 8 and over).
Materials
- Fimo Sable sahara (n°070)
- Fimo Métalisé violet (n°602)
- Fimo Copper (n°027)
- Fimo Black (n°009)
- very little Fimo Métalisé gold (n°112)
- one large wooden skewer and 2 small ones
- aluminum foil
Step-by-step manufacturing

The largest elements (body, head, legs and pumpkin) are made from a tightly-packed ball of aluminum foil, over which a flat sheet of Fimo clay is draped.
Make sure head/body/pumpkin sizes are in proportion (a large head for a witch gives her a "fun" look). For the pumpkin, simply wrap it (except the top, which will be hidden by the dress) and mark the pumpkin's quarters.
Make sure head/body/pumpkin sizes are in proportion (a large head for a witch gives her a "fun" look). For the pumpkin, simply wrap it (except the top, which will be hidden by the dress) and mark the pumpkin's quarters.

Stick the wooden spike into the pumpkin (without piercing the base!).
Thread the body onto the spike. Drape a flat area of Fimo Violet, pleating the dress. Make a colombin in Fimo Violet for the arm, glue it to the dress, marking the elbow, and add the little hand in Fimo sable to the end of the corolla-shaped arm colombin. If the hand is to hold a wooden broom, add it before baking. Make the collar-arm in Fimo Noir, which should be pleated and hide the upper arm. Tiny gold metallic petals, arranged in a trio, decorate the shawl.
And why not add a bow tie? Important: think of the fastener! Unless your witch is in a sitting position, you'll need to think of a fastening before baking: a folded wire pricked in the back and embedded in the aluminum ball works well (the fimo witch, once baked, is very light).
And why not add a bow tie? Important: think of the fastener! Unless your witch is in a sitting position, you'll need to think of a fastening before baking: a folded wire pricked in the back and embedded in the aluminum ball works well (the fimo witch, once baked, is very light).

Make the legs: cover the shaped aluminum with a flat layer of Sable fimo, then add the elegant shoes. Use a small spade to fix each leg to the body, with the upper parts hidden under the dress.
[espace-pub-carre-uni]
The aluminum ball forming the head is threaded onto the spade until it meets the shawl, then covered with a flat layer of Sable clay (be careful to have clean hands when starting to work with a light color). The face is formed, then the hair is added... one by one, by gluing it onto the sand Fimo. No need to add hair where the hat will cover.
Add the hat in purple Fimo (can be made on a small aluminum ball), then the tone-on-tone ribbon.

It's only once baked (in the oven at 130° for around 20 minutes) that the eyes, eyebrows and mouth are drawn with a fine acrylic felt-tip pen, then the cheeks are made up (with real make-up).

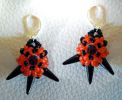 | Halloween ear | rings: free tutorial to make these spicy little jewels! |
want to share? Publish your creative projects !