Manual activities for children, family crafts
- Activities with wooden letters
- Mother's Day crafts
- Decorate your pens for back-to-school
- Notebook collage and makeover
- Painting dinosaurs
- DIY with straws
- Cardboard castle
- Cardboard dragon
- Making girly beaded barrettes
- Design your own soccer jersey
- Decoration recipe for children
- Making stickers
- Wooden bookmark
- Pyrography box
- Indiana Jones crafts
- Indiana Jones model
- Lego Indiana Jones sets
- Autumn crafts
- Halloween activities
- Carnival crafts


DIY for Mother's and Father's Day
Do-it-yourself ideas forkids and teens to give mom or dad a gift they've made themselves...
trendy decorative gifts to be made with the latest hobby materials, a moment of discovery for all!
trendy decorative gifts to be made with the latest hobby materials, a moment of discovery for all!


A door plaque to personalize according to the colors favored by the mother to be celebrated, a do-it-yourself gift whose charm lies in the union of different materials.
Techniques: painting, collage.
Materials: cardboard support, felt, mini mosaic, napkin, plastic buttons, lace ribbon...
>>Do-it-yourself detail Door plaque
 Not to be missed... Not to be missed...Gift ideas from our designers for Mother's Day Jewelry, bags, decorations, treasure boxes, lamps, mirrors... |

Jewelry boxes decorated in 3 different styles, so every mother can be spoiled!
Techniques: paint, rhinestone collage.
Materials: wooden boxes, rough wooden case
Materials: wooden boxes, rough wooden case

Children's gifts made from Decopatch collage, like this oriental hand mirror.
techniques:paper collage.
Materials: cardboard, polystyrene
>> Details of DIY collage gifts
Discoverlots of ideas for Mother's Day outings on Allofamille.fr!
Wooden bookmarks, so you don't lose track of what you're reading or a recipe in a cookery book, a DIY idea that's just as suitable for moms as dads and can be made by toddlers.....
An easy and creative craft using L'Atelier bois figurines.
An easy and creative craft using L'Atelier bois figurines.

Colorful coasters are a practical gift for Mom and Dad's friends, and a beautiful addition to any table!
Materials required :
- cardboard coasters with space for mosaic,
- acrylic paint
- protective varnish
- acrylic mini-mosaic (in 10 mm or even 5 mm squares)
- white glue.
- cardboard coasters with space for mosaic,
- acrylic paint
- protective varnish
- acrylic mini-mosaic (in 10 mm or even 5 mm squares)
- white glue.


Start by painting the coasters with acrylic paint. Once the paint is dry, the adult sprays varnish to protect the paint.
Once the varnish is dry, the child can glue a part of the coaster and arrange the micro-mosaic.
A teenager can use the mosaic 2 times smaller (5 mm) for a finer decoration (photo on the right, with a matte/transparent color scheme).


Discover easy mosaic kits for kids to create wall decorations they'll be proud of!
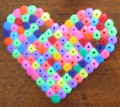
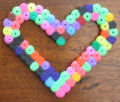
Forthe little ones, a gift craft with Hama beads

With a handful of colored Hama beads and a support grid, you're ready to get started.
All you have to do is arrange the beads on the support grid, either randomly (not so easy for 2-year-olds) or by drawing a pattern.
You can also draw only the outline (with at least 3 beads wide), but the object will be more fragile. You can use all kinds of patterns, feminine for moms or masculine for dads (for a Father's Day gift, you can use only white and black beads in a checkerboard pattern).
You can also draw only the outline (with at least 3 beads wide), but the object will be more fragile. You can use all kinds of patterns, feminine for moms or masculine for dads (for a Father's Day gift, you can use only white and black beads in a checkerboard pattern).
Then it's the adult's turn to work, placing a sheet of baking paper on the bead-covered grid and ironing with a hot iron: the plastic beads will melt slightly and weld together. Once one side has been soldered, turn the object over to detach it from the grid (be careful, the plastic retains the heat well) and replace the baking paper to iron it upside down. Once cooled, the object is quite solid.
 <img src="/photos/enfant/maman_coeur_perles4.jpg" border="0" width="120" height="101" alt=bricolage cadeau coeur">
And for Mother's Day, a card is always very much appreciated, see the scrapbook-style cards made by children...