
Home decorations for home decoration
- Interior design
- Making for children
- Do-it-yourself decorating ideas
- Relook furniture and objects
- Baby room decoration
- Children's bedroom decoration
- Marine bathroom decor
- Making a cardboard table
- Cardboard console table
- Deco & gift shopping engine
Weaving and macramé decoration

Handcrafted home decorations: circular weavings, woven frames and macramé hangers
Handcrafted home decorations: circular weavings, woven frames and macramé hangers

Handcrafted vegetal pillow

Ecological plant pillow with the scent of Provence made from spelt husk and lavender
Ecological plant pillow with the scent of Provence made from spelt husk and lavender
Make a changing table - chest of drawers
There are several advantages to making your own real-wood changing table:
- design it exactly to the dimensions you want,
- customize it to the look of your baby's room, of course,
- paint it with natural paints to guarantee healthy air.
for the same reason, this furniture must be made from solid, unglued wood, not chipboard or melamine, which contain far too many VOCs for a child's bedroom.
The boards used are untreated fir site boards. The first and least amusing step is to plane and sand them.
The depth of the cabinet is 4 times the width of a plank, to avoid tedious cutting: this provides space next to the changing mat for a length of space for baby care products.
The width of the cabinet has been determined to hold 2 blocks of metal drawers. Doing the drawers yourself in raw wood is time-consuming and complex, but drawers are so practical for storing baby's little things! So the metal drawer solution was chosen. For the front of the cabinet, a double curtain, matching the outer fabric of the bumper pad, is placed on a thin rod to hide the drawers nicely.

Wood cutting
As the site boards are 14 cm wide (and 20 mm thick), you'll need to cut:
- 8 lengths of 70 cm (sides)
- 8 lengths of 99 cm (top and bottom).
Please allow for 4 cleats, each 25 mm long and 56 cm wide.
For the bottom, as there's no need for it to be thick, paneling (in untreated fir, of course) is ideal. They should cover an area of 74 cm by 99 cm.
Board assembly
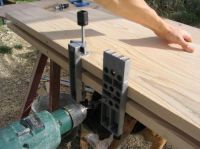
The boards are assembled in blocks of four using wooden dowels. A drilling guide is very useful to place the dowels impeccably and easily.
Cabinet assembly

At the top and bottom of each side, a cleat is fastened to hold the boards tightly together.
The top and bottom faces are fastened to the sides, again using dowels (so there are no visible screws on the top).
The drawer units can then be inserted.


The bottom is then made by assembling the panel panelling (using solvent-free wood glue), then fastening the panel to the back of the unit with nails.
The "changing table" section consists of screwing 8-10 cm-high, rounded-corner edges onto the top plate (from below), so that the changing mattress fits exactly where it's supposed to. Another edge is added in front of the chest of drawers, to accommodate baby care products. This double separation keeps the child even further away from the edge, and for a restless baby, it's an appreciable added safety feature.
Painting the chest of drawers
The natural paints used are those chosen for the baby girl's bedroom, by Natura.
The inside of the chest of drawers is first painted with the ecru color, so the inside of the chest of drawers will also be washable. The top is also in ecru, except for the changing mat, which is painted cyclamen.
Both sides and the bottom of the chest are painted parma.
A second coat is of course necessary to unify the shade.
Store the furniture in a dry place for several weeks before installing it in the baby's room, to prevent it from perfuming the room: even if the odors emitted are not harmful synthetic VOCs, natural paints emit the scents of the oils used, and this perfume can be strong for the first few days or even weeks.
Store the furniture in a dry place for several weeks before installing it in the baby's room, to prevent it from perfuming the room: even if the odors emitted are not harmful synthetic VOCs, natural paints emit the scents of the oils used, and this perfume can be strong for the first few days or even weeks.

Chest of drawers finishes

The dresser is finished off with brightly-pleated curtains, dotted here and there with little flowers cut out of matching felt.
The curtains should be twice as wide as the dresser, to obtain pretty pleats.
A small arched cushion, matching the crib bumper, is placed on the changing table for baby's comfort, and then becomes a soft toy!