
Pleasure of painting - Introduction to painting
- Stencils
- Painting on wood
- Wood cutting
- Varnishing furniture
- Ceramic painting
- Fabric painting
- Painting on glass
- Porcelain painting
- Decorating wooden rods
- Trompe l'oeil painting
- Natural paint
- Painting basics
- Landscape painting
Weaving and macramé decoration

Handcrafted home decorations: circular weavings, woven frames and macramé hangers
Handcrafted home decorations: circular weavings, woven frames and macramé hangers
Illuminations, illuminated objects and jewelry

Illuminations, illuminated objects and jewelry, ornate initials, unique pieces
Illuminations, illuminated objects and jewelry, ornate initials, unique pieces


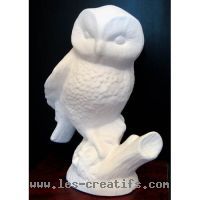
How to paint raw ceramics
Here are our techniques and tips for painting on raw white ceramic.
Tools
You'll need:
- Raw ceramic painting surface
- Acrylic paints in various colors. Choose the finish (matte, gloss, satin, lacquer, etc.);
- Various brushes;
- Clear spray varnish (not compulsory).
All water-soluble acrylic paints are highly concentrated and can be diluted up to three times their volume. It is advisable not to use paints that are too thick, as this blocks out small details and reliefs rather than bringing them out.
Preferably choose paints that are miscible with each other and dilutable with water, as when a paint becomes too thick, simply add water to make it more fluid.
Preferably choose paints that are miscible with each other and dilutable with water, as when a paint becomes too thick, simply add water to make it more fluid.
Cleaning and painting

Brush the object with a large, soft brush to remove any powder that may remain and leave lumps during painting. If necessary, use fine sandpaper to smooth out any rough edges.
Paint the object to be painted, without overloading the brush, and spread a thin layer.
The order of colors
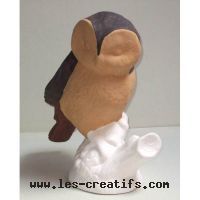
The order in which the different paints are applied depends on your choice. We usually work from darkest to lightest. But the first coat of paint can also be in a medium tone. This is followed by darker and lighter details, using more diluted colors. The final touches are on the finer elements that accentuate the contrasts.
Dry brushing

Drybrushing is a painting technique that can be applied or not, depending on the desired effect.
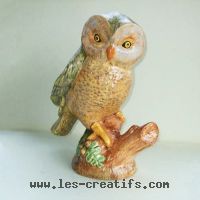
We start with the acrylic painting technique, moving from one color to the next. Once you've finished, apply the brushing technique using a flat brush and paint that's almost dry. Brush briskly over the area to be painted. Apply the paint only at the top of the relief, to reveal details more clearly. A small amount of light paint is usually used to create a semblance of relief lighting and bring out details.
If you want to imitate a patina or "age" a figure, apply light brushstrokes over the entire surface. In this way, a lighter or different shade is irregularly applied, giving the object a worn or dirty appearance. Fine details are thus highlighted. In addition, depending on the intensity of brushing, you can easily create a gradient from darker to lighter. Don't apply too much paint. To check the amount of paint on the brush, lightly run the flat of the bristles over a paper towel or your finger. If there's too little paint, the color won't settle; if there's too much, it will cover up the details.
Advice
1. If you're painting an angel or a character, start with the clothes, then the hair, followed by the face, hands and feet. If you make any mistakes, you can go back over your work as many times as necessary. If you want to add glitter, glue it on last.
2. If you're painting a cat (cow, horse, etc.) in black and white, draw the spots on the figure with a pencil. Start with the white. When you do the black, take an old paintbrush, preferably a small one with bristles of different heights. Apply the black paint to the edge of the white, overlapping slightly to simulate the bristles. 3. If you've chosen a character or an animal, the hardest part is still to come: the eyes, which give life to your object. The eyes are made in several stages: First, they'll be painted entirely in black (unless your object already has a face in a dark tone; in that case, you can skip a stage). Let dry and then paint the inside of the eyes in white, leaving a tiny black line around them (like a round frame). Let dry well and, depending on your talents, you have two possibilities: - The simplest is to make a black circle which should touch the edges at the top and bottom. After drying, make a tiny white dot in the black circle. Careful! don't make this dot in the middle, but a little to the side, either top or bottom, as this indicates the direction of the eyes; - If you're more experienced, instead of a black circle, first make a large circle in the color you want the eyes to be (brown, green, blue). Make this circle large enough, let it touch the edges at the top and/or bottom, and then make a black pupil in it, never right in the middle, but also letting it touch the first colored circle on one side, and finally, the tiny white dot which is the reflection of life! 4. If you make a mistake, rub lightly with a knife or fine sandpaper. This removes the paint and starts again.
5. Acrylic paint, although soluble in water, becomes hard after drying. For this reason, don't leave pots open too long. Cover up with a smock or an old piece of clothing, as stains don't come off. Don't leave brushes in paint and wash them immediately after use, as they will become hard and unusable. 6. For aesthetic reasons, you can apply a coat of clear spray varnish, according to your choice of gloss, satin or matt (available in DIY superstores).
Fiche créative proposée par