Building a children's wooden kitchen
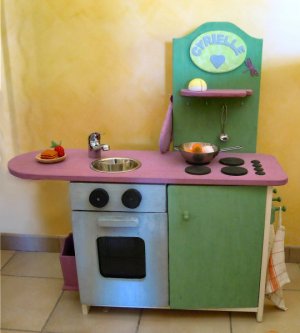
A wooden children's kitchen is a toy you can make for your children that you can be sure will be used for a long time to come! It's a play space to be shared, so it needs to be large enough. The small details are there to make it "look like the real thing", and salvaging is a good, economical way to make the small accessories.
This DIY project requires woodworking tools: jigsaw, drill, sandpaper... and of course paint, and even better, natural paint.
This home-built project is also a great way to spend time together as a family, so don't hesitate and get started...
Supplies
The wooden boards required are 30 cm wide, the most economical, and 1.8 mm thick.
A total length of 539 cm is required.
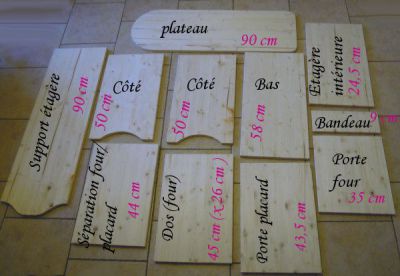
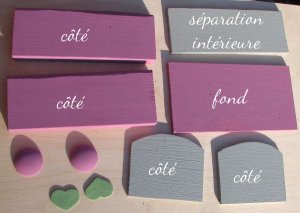
Here are the parts to be cut out: - top: 90 cm (round off the corners and round off the left side even more: the "bar") - shelf support (to be placed vertically): 90 cm with a "chapeau gendarme" cut-out - 2 sides: 50 cm (rounded cut-out on the inside) - bottom (horizontal): 58 cm - oven/board divider (vertical): 44 cm - the back of the oven: 45 cm and only 26 cm wide - the cupboard door: 43.5 and only 29 cm wide (so that the door can flap) - the inside shelf: 24.5 cm - the oven door: 35 cm (hollow out the central part with a square with rounded edges) - the oven fascia: 9 cm - 2 thick wooden rounds 6 cm in diameter for the oven knobs.
For the "chapeau gendarme" or bar rounding, take a 60 cm wide sheet of paper, fold it in 2, draw the half circle and cut it out. Open the sheet and transfer the shape to the wood. It's easier to paint the various parts before assembly.
Assembly
Sink installation
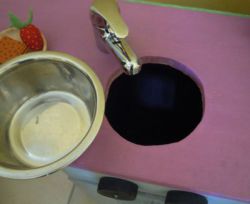
The sink is a round stainless steel dish with a rim (i.e. a bowl for a small dog!). Cut the shape out of the tray (towards the edge, not in the middle): first drill towards the center to pass the jigsaw blade, then cut towards the edge and around the circle. Drill one or two holes at the edge of the sink to fit the faucet. Screw it under the tray.
Bar and oven assembly
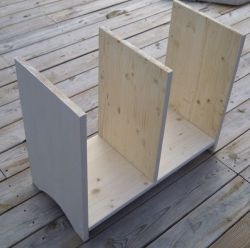
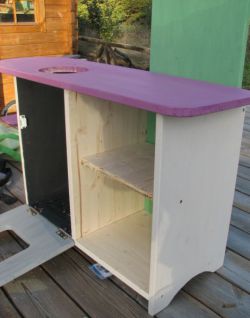
Assemble the vertical green board (to support the small shelf and various accessories), which is placed on the bottom board.
Assemble the bar, which protrudes on both sides but more on the left side, the "bar" part.
Add the inner shelf of the cupboard (4 small screws inserted in the sides are enough to support the shelf).
Paint the inside of the oven black.
Fasten the oven door with an inner hinge at the bottom + a magnet to keep the door closed. Glue a plexi-glass plate (salvaged from a picture frame) to make the glass part of the oven: essential for monitoring cooking!
Cut the oven handle from a wooden strip and fix it with 2 screws from the inside of the door.
Screw the 2 large knobs onto the strip (so they can turn like real knobs).
Fitting the cupboard door
The cupboard door opens via 2 dowels to be positioned at the top and bottom of the door. Using a drill, cut a hole the diameter of the dowels in the bottom and bar boards (aligned vertically). Add a wooden plug as a cabinet knob.
Accessories
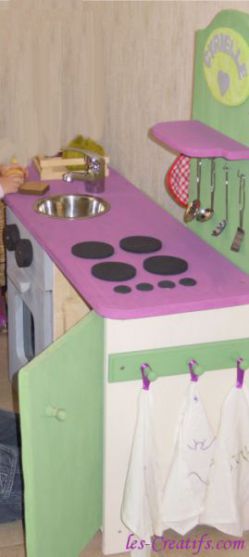
Attach accessories (with screws or glue): a small shelf (24 x 12 cm) with rounded edges, an oval wooden plaque with the child's name in wooden letters, a tea towel holder on the right-hand side and a wooden spoon holder on the left-hand side to serve as a pocket divider.
For the baking trays, 4 round wooden plates are painted black and glued together, and for the knobs, flat wooden cabochons are also painted black and glued together. Under the shelf and on the side, round hooks are screwed in for the child to place spoons, a potholder... For a decorative touch, little wooden figurines are also painted and glued here and there... The little extra is to also make little tea towels, embroidered with simple motifs or with the child's first name: they're very popular! And don't forget a tiny sponge cut from Mum's...
For the baking trays, 4 round wooden plates are painted black and glued together, and for the knobs, flat wooden cabochons are also painted black and glued together. Under the shelf and on the side, round hooks are screwed in for the child to place spoons, a potholder... For a decorative touch, little wooden figurines are also painted and glued here and there... The little extra is to also make little tea towels, embroidered with simple motifs or with the child's first name: they're very popular! And don't forget a tiny sponge cut from Mum's...
Wooden toaster
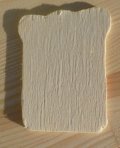
Not forgetting the indispensable tartine, made of fine wood and painted ecru.
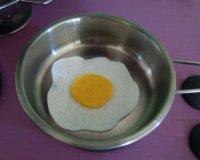
Then the fried egg, made of felt.
Other foods can be made in felt or salt dough with the active collaboration of the children.
A bit of work, but years of play ahead, alone or with siblings!


